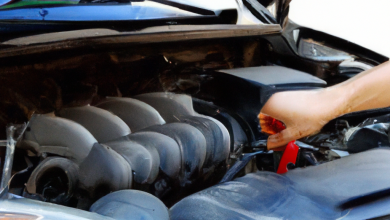
Discover the importance of a clean cabin filter, learn replacement signs, necessary tools, and follow our step-by-step guide for optimal Vehicle Air Conditioning quality. Is your vehicle’s air conditioning underperforming? A clean cabin filter is essential for maintaining optimal air quality and comfort within your car. Over time, cabin filters can become clogged with dust, debris, and allergens, leading to reduced airflow and inefficient cooling.
In this promotional article, we will guide you through the importance of a clean cabin filter and how to identify when it needs replacement. We’ll also provide you with a detailed step-by-step guide, outlining the necessary tools and easy processes to follow.
Not only will you learn how to keep your air conditioning system running smoothly, but you’ll also discover the numerous benefits of regular filter maintenance. Whether you’re a DIY enthusiast or simply looking to enhance your vehicle’s performance, this comprehensive guide will equip you with the knowledge you need for better driving comfort.
Understanding The Importance Of A Clean Cabin Filter
A clean cabin air filter is essential for maintaining a comfortable and safe driving environment. It serves the crucial function of keeping the air within your vehicle free from dust, pollutants, allergens, and unpleasant odors. Here are some key reasons why understanding the importance of a clean cabin filter is vital:
- Improved Air Quality: A clean cabin filter traps harmful particles, ensuring that you and your passengers breathe clean air. This is especially important for individuals with allergies or respiratory conditions.
- Enhanced Comfort: When the filter is clogged, it can restrict airflow, making it harder for your vehicle’s air conditioning system to function efficiently. A clean filter ensures optimal airflow, leading to a more comfortable driving experience.
- Better HVAC Performance: A clean cabin filter allows your vehicle’s heating and cooling systems to operate at their best. This helps in maintaining the desired temperature inside your vehicle without overworking the system.
- Prevention of Unpleasant Odors: Old and dirty filters can contribute to smells within your vehicle. Regularly replacing your cabin filter helps eliminate any musty or unpleasant odors originating from dust and debris accumulation.
- Longer Lifespan of HVAC Components: By keeping the cabin air filter clean, you help prolong the life of your vehicle’s HVAC system. A clogged filter can cause additional strain on the system, leading to costly repairs.
Understanding how to properly maintain your cabin air filter is a critical aspect of vehicle upkeep that often goes overlooked. Regular replacements will lead not just to enhanced air quality, but also to a more reliable and efficient vehicle overall.
How To Identify When To Replace The Filter
Identifying when to replace your vehicle’s air conditioning cabin filter is crucial for maintaining air quality and ensuring the efficiency of your HVAC system. Here are some key signs that indicate it’s time for a replacement:
- Reduced Airflow: If you notice that the airflow from your vehicle’s vents has decreased, it may be a sign that the cabin filter is clogged and requires replacement.
- Unpleasant Odors: A musty or foul smell emanating from the air conditioning system can indicate mold or bacteria buildup in a dirty cabin filter.
- Visible Dirt and Debris: If you can access the filter and see dirt, leaves, or other debris, it is time to replace it, even if the airflow seems adequate.
- Allergy Symptoms: Increased allergy symptoms or respiratory issues while driving can suggest that your cabin filter is no longer effectively filtering pollutants.
- Time Interval: As a rule of thumb, consider replacing your cabin filter every 12,000 to 15,000 miles or once a year, whichever comes first. Always refer to your vehicle’s manual for specific recommendations.
Regularly monitoring these indicators will help ensure that your vehicle’s air conditioning system works effectively and that the air inside your car remains clean and pleasant. Keeping an eye on your cabin filter’s condition is an essential part of vehicle maintenance that you shouldn’t overlook.

Necessary Tools For Replacing Your Cabin Filter
To successfully replace your vehicle’s air conditioning cabin filter, having the right tools on hand can make the process smoother and more efficient. Here’s a list of the necessary tools you will need:
- Flathead screwdriver – This can be used to pry open any clips or covers that may be blocking access to the cabin filter.
- Phillips screwdriver – Some vehicles may require a Phillips screwdriver to remove screws securing the filter housing.
- Socket wrench set – A socket wrench might be necessary for vehicles that have bolts securing the filter compartment.
- New cabin filter – Ensure you have the correct replacement filter that fits your vehicle’s make and model.
- Flashlight – A flashlight can help illuminate dark areas under the dashboard or near the engine compartment, facilitating easier access to the filter.
- Vacuum cleaner – While not always necessary, a vacuum can help clean any debris and dust that may have accumulated in the filter area during the replacement process.
By gathering these tools before starting, you can streamline the process and avoid any interruptions as you learn how to replace your cabin filter effectively.
Step-By-Step Guide On How To Replace The Filter
Replacing your vehicle’s air conditioning cabin filter is a straightforward process that can significantly enhance your driving experience. Follow these detailed steps to learn how to effectively replace your cabin filter:

- Gather Your Tools: Before you start, make sure you have the necessary tools ready. This typically includes a screwdriver, a new cabin filter, and possibly a pair of scissors if adjustments are needed for the new filter.
- Locate the Cabin Filter: The cabin filter is usually found behind the glove compartment or under the dashboard. Refer to your vehicle’s owner manual to find the exact location.
- Remove the Glove Compartment: If your cabin filter is behind the glove compartment, gently push in the sides of the compartment to release the stops, allowing it to drop down for better access.
- Access the Cabin Filter Cover: Look for a cover or a panel that protects the cabin filter. Remove any screws or clips holding it in place and set them aside.
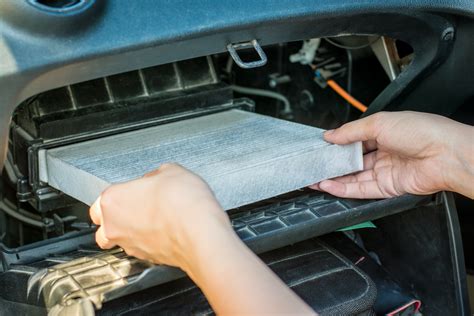
- Take Out the Old Filter: Carefully pull out the old cabin filter. You may notice dirt and debris; take this moment to clean the housing with a cloth if needed.
- Install the New Filter: Take your new cabin filter and ensure it’s oriented correctly, usually indicated by an airflow direction arrow on the filter. Slide it into place, making sure it fits snugly.
- Reattach the Cabin Filter Cover: Replace the cover or panel you removed earlier, securing it with the screws or clips.
- Replace the Glove Compartment: Lift the glove compartment back into place and push the sides to lock it in.
- Test the AC System: Start your vehicle and turn on the air conditioning to ensure it’s working efficiently. You should notice improved air quality and flow.
By following these steps on how to replace your cabin filter, you can maintain a fresh and clean atmosphere within your vehicle, contributing to your overall comfort and health.
Benefits Of Regularly Replacing Your Cabin Filter
Regularly replacing your vehicle’s cabin filter offers numerous advantages that contribute to both your health and the performance of your car’s air conditioning system. Here are the primary benefits:
- Improved Air Quality: A clean cabin filter effectively traps dust, pollen, and other airborne particles, ensuring that the air you breathe inside the vehicle is fresh and clean.
- Enhanced A/C Performance: A clogged cabin filter can restrict airflow to the HVAC system, making your air conditioning work harder than necessary. Replacing it regularly allows the system to operate efficiently.
- Increased Comfort: A functional cabin filter helps maintain a comfortable temperature inside the car by balancing the airflow, contributing to a more enjoyable driving experience.
- Health Benefits: By filtering out harmful allergens and pollutants, a clean cabin filter can help reduce the risk of respiratory issues and allergic reactions, thus promoting better health for all passengers.
- Cost-Effectiveness: Regular maintenance, including cabin filter replacement, can prevent costly repairs down the line by avoiding damage to the A/C system and ensuring that it runs smoothly.
Knowing how to regularly replace your cabin filter is essential for maintaining a healthy environment inside your vehicle, improving performance, and enhancing your overall driving experience.

Frequently Asked Questions
What is the purpose of the cabin air filter in a vehicle?
The cabin air filter prevents dust, pollen, and other pollutants from entering the vehicle’s interior, ensuring clean air for passengers.
How often should you replace the cabin air filter?
It is generally recommended to replace the cabin air filter every 12,000 to 15,000 miles, or at least once a year, but you should consult your vehicle’s owner manual for specific guidelines.
What are the signs that the cabin air filter needs to be replaced?
Signs include reduced airflow from the vents, unpleasant odors in the cabin, and increased dust and pollen inside the vehicle.
What tools are needed to replace a cabin air filter?
Typically, you’ll need a flathead screwdriver or a ratchet and socket set, depending on your vehicle model, along with the new cabin air filter.
Can I replace the cabin air filter myself, or should I take it to a mechanic?
Replacing a cabin air filter is a relatively easy DIY task that most vehicle owners can handle with basic tools and the right instructions.
Where can I find the cabin air filter in my vehicle?
The cabin air filter is usually located behind the glove compartment or under the dashboard; consult your vehicle’s manual for exact location.
What type of cabin air filter should I purchase for my vehicle?
You should purchase a cabin air filter that is specifically designed for your vehicle’s make and model; using an OEM or high-quality aftermarket filter is recommended.