
Explore essential insights into vehicle air conditioning, from components and common issues to repair processes and maintenance tips for optimal performance.A Step-By-Step Guide To Vehicle Air Conditioning Repair. As the temperatures rise, a well-functioning vehicle air conditioning system transforms your driving experience from uncomfortable to enjoyable.
Whether you’re facing inadequate cooling or unusual noises, understanding how to diagnose and repair air conditioning issues can save you time and money. This comprehensive guide will walk you through the essential components of your vehicle’s air conditioning system, highlight common problems, and provide a step-by-step process for effective repairs.
You’ll also learn about the necessary tools and equipment to tackle these repairs confidently, ensuring your air conditioning system remains in top-notch condition for years to come. Finally, discover maintenance tips to prolong the life of your vehicle’s air conditioning system and keep those summer drives cool and relaxing. Let’s get started on keeping your ride fresh and comfortable!
Understanding Vehicle Air Conditioning Components: An Overview
When it comes to A Step-By-Step vehicle air conditioning repair, a solid understanding of the components involved is essential. Each part plays a critical role in ensuring the air conditioning system operates efficiently. Here’s a breakdown of the main components:
- Compressor: The heart of the system, the compressor circulates refrigerant throughout the system. It compresses the refrigerant, turning it into a high-pressure gas.
- Condenser: Located at the front of the vehicle, the condenser cools the refrigerant gas back into a liquid state by releasing heat. This is often done with the help of airflow while driving.
- Expansion Valve: This component regulates the flow of refrigerant into the evaporator, ensuring that it enters at the right pressure and amount.
- Evaporator: Inside the vehicle, the evaporator absorbs heat from the cabin air, allowing the refrigerant to evaporate as it cools the air that is circulated within the passenger compartment.
- Accumulator/Drier: This component removes moisture from the refrigerant system to prevent freezing and corrosion, contributing to the longevity and efficiency of the AC system.
- Refrigerant: A chemical used to transfer heat, typically R-134a or R-1234yf, depending on the vehicle. Ensuring the correct type and amount of refrigerant is crucial for optimal performance.
- Blower Motor: The blower motor moves air across the evaporator and into the cabin, allowing passengers to feel the cool air generated by the system.
Understanding these components is crucial for accurately diagnosing and repairing air conditioning issues. Each part must be regularly maintained and inspected to ensure the system functions effectively, contributing to a comfortable driving experience.
Common Air Conditioning Issues: Diagnosis and Identification
Identifying common air conditioning issues in your vehicle is crucial to addressing and repairing problems effectively. Below are some of the most prevalent air conditioning concerns, along with tips for diagnosis:

- Insufficient Cooling: If your vehicle’s air conditioning is not blowing cold air, this could indicate low refrigerant levels, a malfunctioning compressor, or a blocked condenser.
- Unpleasant Odors: Foul smells can indicate mold or mildew buildup in the system. Check the cabin filter and the drains for blockages.
- Strange Noises: Noises such as clicking, hissing, or squealing could suggest an issue with the blower motor, compressor, or debris lodged in the fan.
- Visible Leaks: Inspect areas around the air conditioning components for signs of liquid leaks, often indicating refrigerant loss. Green or oily stains may be a sign of a refrigerant leak.
- Intermittent Performance: If the air conditioning works sporadically, this might point to electrical issues, faulty fuses, or a failing thermostat.
Regularly monitoring your vehicle’s air conditioning performance can help catch these issues early. When diagnosing problems, always refer to your vehicle’s manual for specifics regarding the air conditioning system.
A Step-By-Step Process for Vehicle Air Conditioning Repair
Repairing your vehicle’s air conditioning system can seem overwhelming, but by following this A Step-By-Step process, you can tackle the task with confidence. Below is a practical guide to help you through each stage of the repair:
- Safety First:Before starting any repair work, ensure the engine is off, the car is in a safe area, and you’re wearing appropriate safety gear such as gloves and safety glasses.
- Identify the Problem:Diagnose the specific issue with the air conditioning system. Common problems include insufficient cooling, strange noises, or visible leaks. Refer to the previous section for guidance on diagnosis.
- Gather Necessary Tools:Collect all required tools and equipment as mentioned in the Tools and Equipment Needed for Effective Air Conditioning Repair section. Make sure everything is in proper working order.
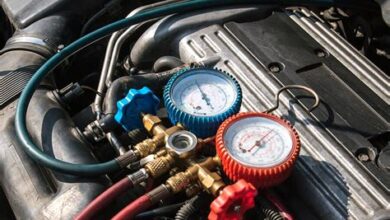
- Check the Refrigerant Level:Using a refrigerant gauge, check the level of refrigerant in the system. If it’s low, you’ll need to recharge it, but first, inspect for leaks.
- Inspect the Components:Carefully examine all components of the air conditioning system, including the compressor, condenser, and evaporator. Look for signs of wear, damage, or leaks that might need addressing.
- Repair or Replace Faulty Parts:Based on your inspection, replace or repair any damaged components. This may involve removing and installing new parts, so reference your vehicle’s manual for specific instructions.
- Recharge the System:If the refrigerant level was low, recharge the system using the appropriate type of refrigerant for your vehicle. Be mindful of the proper charging procedure to avoid overcharging.
- Run and Test the System:After making repairs and recharging, start the vehicle and turn on the air conditioning. Allow it to run for a few minutes before checking for proper operation and cooling efficiency.
- Check for Leaks:Use a UV dye or leak detection kit to ensure there are no leaks in the system. If leaks are present, further action may be necessary.
- Finalize Your Work:Once everything is functioning correctly, clean up your workspace, dispose of any old components properly, and document the repairs made for future reference.
Following this A Step-By-Step approach can help you efficiently navigate the repair process and get your vehicle’s air conditioning system back in excellent working condition. Remember, regular maintenance is key to avoiding future issues.

Tools and Equipment Needed for Effective Air Conditioning Repair
When undertaking a vehicle air conditioning repair, having the right tools and equipment is essential for achieving optimal results. Here’s a list of the essential tools you will need:
- AC Manifold Gauge Set: This is crucial for measuring the pressure of the refrigerant in your vehicle’s system.
- Vacuum Pump: This tool is used to remove air and moisture from the system before recharging it with refrigerant.
- Refrigerant Recovery Machine: Necessary for safely recovering refrigerant from the AC system to prevent environmental harm.
- Leak Detection Tools: Use electronic leak detectors or ultraviolet dye kits to identify leaks in the AC system.
- Refrigerant Scale: A digital scale is necessary for accurately measuring the amount of refrigerant added to the system.
- Basic Hand Tools: Wrenches, screwdrivers, and pliers will be needed for various repairs and adjustments.
- Safety Gear: Protective goggles and gloves should be worn to ensure safety while performing repairs.
- Thermometer: A digital thermometer helps in measuring the temperature of the air coming out of the vents for efficiency testing.
- Service Manual: A vehicle-specific service manual provides detailed information on the AC system layout and repair procedures.
Equipped with these tools and equipment, you will be ready for a comprehensive A Step-By-Step approach to vehicle air conditioning repair, ensuring that you can diagnose and fix issues effectively.
Maintaining Your Vehicle’s Air Conditioning System for Longevity
To ensure that your vehicle’s air conditioning system runs efficiently over the years, regular maintenance is essential. By following some simple care tips, you can prevent major issues and extend the life of your AC system. Here are key steps to consider:
- Regularly check the refrigerant level: Ensure that your vehicle has the correct level of refrigerant. Low levels can lead to inadequate cooling and potential damage to the compressor.
- Change the cabin air filter: A clogged cabin air filter can restrict airflow and affect your AC system’s performance. It’s advisable to replace the filter annually or as specified in your vehicle’s manual.
- Run the AC regularly: Even in cooler months, running your AC occasionally helps to keep the system lubricated and prevents the seals from drying out.
- Inspect for leaks: Regularly check hoses and connections for any signs of wear and tear or leaks. Early detection can save you from costly repairs.
- Clean the condenser: Make sure the condenser, located in front of the radiator, is free from debris. A clean condenser allows for better airflow and performance.
- Schedule professional inspections: Having a qualified technician perform routine inspections can help identify potential problems before they escalate, ensuring your system remains in optimal condition.
By implementing these maintenance practices, you’ll be taking significant steps toward ensuring your air conditioning system remains effective for years to come, aligning with the A Step-By-Step approach to vehicle upkeep.

Frequently Asked Questions
What are the common signs that indicate a vehicle’s air conditioning system needs repair?
Common signs include weak airflow, warm air coming from the vents, unusual noises when the A/C is turned on, and strange smells.
What tools are necessary for performing air conditioning repairs on a vehicle?
Essential tools include a manifold gauge set, HVAC thermometer, leak detection dye, vacuum pump, and basic hand tools like wrenches and screwdrivers.
What is the first step in diagnosing an air conditioning issue?
The first step is to visually inspect the system for any obvious signs of damage or leaks, followed by checking the refrigerant levels with a manifold gauge.
How can I safely recharge the refrigerant in my vehicle’s A/C system?
To safely recharge the system, turn off the engine and attach the refrigerant can to the low-pressure port, then start the engine and add refrigerant while monitoring the pressure gauge.
What could cause the A/C compressor to fail?
Causes of A/C compressor failure can include low refrigerant levels, electrical issues, debris in the system, or lack of lubrication.
Is it necessary to replace A/C components in pairs, like the compressor and condenser?
While it is not always necessary, replacing components in pairs can be beneficial as it ensures system compatibility and efficiency.
When should I consult a professional for A/C repairs?
You should consult a professional if you are unsure about the repairs, if the problem persists after DIY attempts, or if you suspect a major component failure.